
Art Journal pages with Neil today and a Halloween theme too. He completely forgot about the Oil Pastels for this week (did not read the small print he said LOL), but I'm sure you can think of quite a few ideas after the techniques you saw this week...
Let me help you... you could used Gio/Isa's Joseph's coat techniques for the page background, or on the little tag... you could add an oil pastel drip on the top of the page... you could "ink up" the edges of that skull stamped image by using the oil pastels with an applicator as Michelle showed you.... you could even use the oils pastels in several colours to highlight the texture on the side of the page.
Try it!! you will love it I'm sure.
I will now let Neil tell you how he did his page.
*******
I'd done the base of this page a while ago and loved the deep reds and blacks with metallic highlights. There are lovely embossed elements and I was really happy with it but then couldn't work out what to do with it; until I saw Tim's new Apothecary stamp set that is

The feather was one that my niece found and left here so that was attached to the page. I popped some Ginger Alcohol ink into a bag and stamped the arsenic label onto card, inked with Walnut stain Distress ink and flicked some water onto it before attaching to the bag. The old coin was a button, it seemed to fit the page well. I stamped the Happy Halloween so it looks as if the feather may be writing it

The skull was stamped onto white card, scrunched up and Distress ink pads swiped over the surface in Forest Moss and Walnut Stain. This was sprayed with water to blend and move the colours before ironing flat and dry! The edges were distressed and inked. Small brads were attached and the piece was attached to the page on 3 sides with double sided tape to create a pocket to slip a little extra tag/journalling


Neil used:
Americana True Red and Deep Midnight Blue acrylic paints.
Inka Gold - Old Silver
Stampers Anonymous - Apothecary stamp set
Distress inks - Walnut Stain, Black Soot and Forest Moss
Black archival ink.
Edited to add....
I (Izzy) am joining Neil this week, as I had a play last weekend altering one of the papier maché skull we have on the site. Actually, I have add it for 3 years now, and never took the time to do anything with it. My daughter was so eager to take the Halloween decorations out. I had told her "after Thanksgiving". We celebrated Thanksgiving on Saturday evening, so Sunday morning, the first thing I heard was "can I take the Halloween decorations out now?"
She found the skull in the box and asked me to "paint it to make it look real".... So I did, don't know if you will find that it looks real on the pictures, but it does look spooky here at home...
I did not use the oil pastels either as I honestly did not know how it would turned out, if I would be pleased with it or not and little did I know that I would post it here in the end. But as it happens, I really like it so I thought I would share it with ya ;).
To alter this skull, I first painted it all over with the PaperArtsy Fresco finish paint (Chocolate Pudding... that's for the cracks colours) and let it dry.
I then added a thin layer of PaperArtsy crackle glaze and let that dry.
I painted the top layer using a mix of PaperArtsy Fresco Snowflake with a touch of Pumpkin soup
I had too many cracks at that point, so I covered some of them with another layer of paint.

The teeth took more time... I used the PaperArtsy Fresco paints again... Snowflake, Pumpkin soup, Chocolate pudding.. layer after layer until I was happy with the result
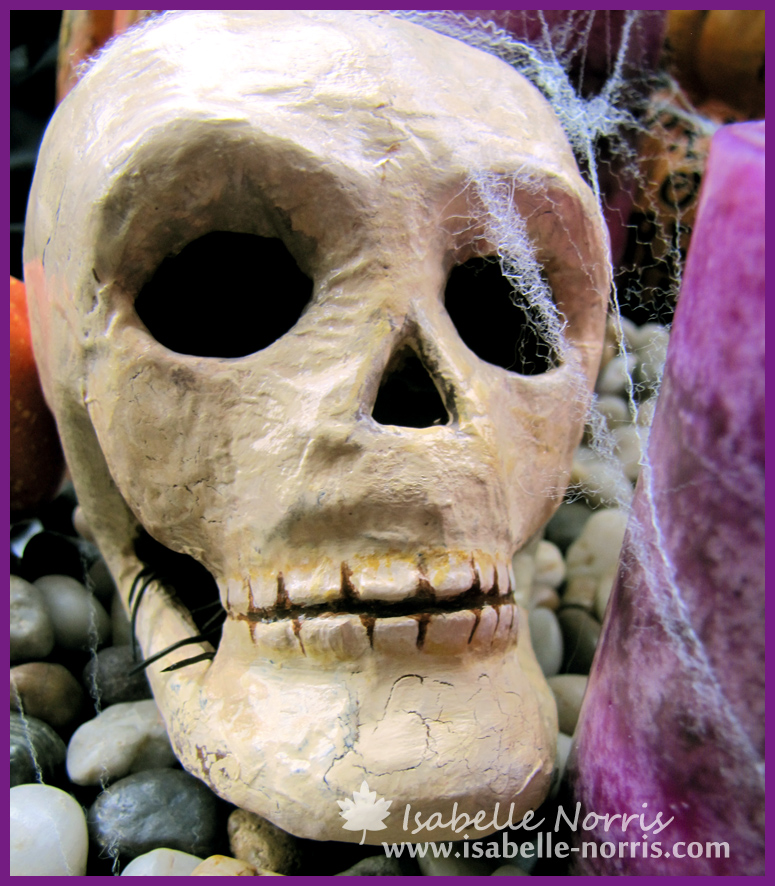
The "eye shadows" were a mix of London night, Chocolate Pudding and Little Black Dress.
I finished with a coat of Satin Glaze to make it more "bone like" and set it aside to dry.

Et voilà...
One of the Halloween displays in our house this year...


here's a couple of pictures I took as I was altering it

To alter this skull I used:
*************
Our special off this week
10% off the Faber-Castell set of 36 oil pastels
enter the code PASTEL10 at checkout


I'm not a Halloween person but I think the skull looks really effective. I love Neil's page, all the embellishments go together really well and the colours are spot on.
ReplyDeleteThey may not have used oil pastels but they are fab all the same. Love the rich tones and texture of Neil's journal page. The skull looks amazing and even though I don't care much for Halloween, I love all the images for it and these are both wonderful.
ReplyDeleteJuliax
Interesting technique this week although I HATE Halloween,one has to look past the subject matter and appreciate the art! So bravo! TFS!
ReplyDeleteNeil I love that AJ. That red is gorgeous and all the embellishments are fab. Nice skull Izzy. The fits perfectly in the final setting. Happy Halloween
ReplyDeleteLove Neil's page, it reminds me of medieval times and Isabelle's skull is far too effective and spooky !
ReplyDeleteWOWWW ! Two spooky and awkful projects (without any Faber Castell Lol) but also two WONDERFUL ones... Bravo, je suis très admirative, c'est du grand art ! Coco xx
ReplyDeleteTwo great projects Neils AJ pages are Fab and the skull Izzy is far to spooky for me looks so real....
ReplyDeleteMaggieH
Two fantastic projects!!!!!!!!!!!!!!!!I'm affraid!!lol!!!!bisous
ReplyDelete